Are you looking to reorganize your WordPress site and move WordPress from root to subfolder, by moving it from the root directory (yourdomain.com) to a subfolder (like yourdomain.com/es or yourdomain.com/blog)? It might sound tricky, but don’t worry, we’ve got you covered with a beginner-friendly, step-by-step guide.
On my own site, simimarketingdigital.com, I recently faced the challenge of moving Spanish content from the root to /es, while shifting English content from /en to the main domain. The goal was simple: keep all my traffic from Google and Bing, avoid broken links, and make the site easier to navigate. With Hostinger’s intuitive hPanel, I pulled it off without a hitch, and you can too.
In this comprehensive guide, we’ll walk you through exactly how to move your WordPress site from root to subfolder on Hostinger hosting. From backups to SEO-friendly redirects, we’ll cover it all with clear instructions, screenshots, and tips to avoid common pitfalls. While this tutorial focuses on Hostinger, the steps work for other hosts like Bluehost or HostGator with minor tweaks.
Use the quick links below to jump to any section and find what you need fast.
Why Move WordPress From Root to Subfolder?
Moving your WordPress site from the root directory to a subfolder can streamline your site’s structure and improve user experience. Here are some common reasons to make the switch:
- Organize Your Content: Free up the root for a landing page or another project while moving your main site to a subfolder like /blog or /shop.
- Multilingual Setups: Like my site, where I moved Spanish content to /es and made English the default at simimarketingdigital.com for better global reach.
- Separate Sections: Isolate specific areas, such as courses or an e-commerce store, for easier management.
- SEO Flexibility: With proper redirects, you can maintain search rankings and avoid duplicate content issues.
A common concern is that moving to a subfolder will tank your SEO. Not true! Google treats subfolders as part of the same domain, so with 301 redirects, your rankings stay intact. If you’re looking to move from a subfolder to the root instead, check out Hostinger’s official guide here.
Pro Tip: Plan this move during low-traffic hours to minimize any disruption.
What You’ll Need Before Starting
To make this process smooth, gather these essentials:
- A WordPress site hosted on Hostinger (or similar shared hosting).
- Access to your Hostinger hPanel login.
- Your WordPress admin credentials.
- Plugins: Install Redirection from the WordPress repository.
- Time: About 30-60 mn, depending on your site size.
- Optional: A backup plugin like UpdraftPlus for extra security.
- Access to Grok.ai (free version) or ChatGPT (free version)
Hostinger’s hPanel makes this process a breeze with its built-in File Manager and backup tools. If you’re not on Hostinger yet, you can sign up here for up to 75% off and a free domain. It’s fast, affordable, and perfect for WordPress beginners.
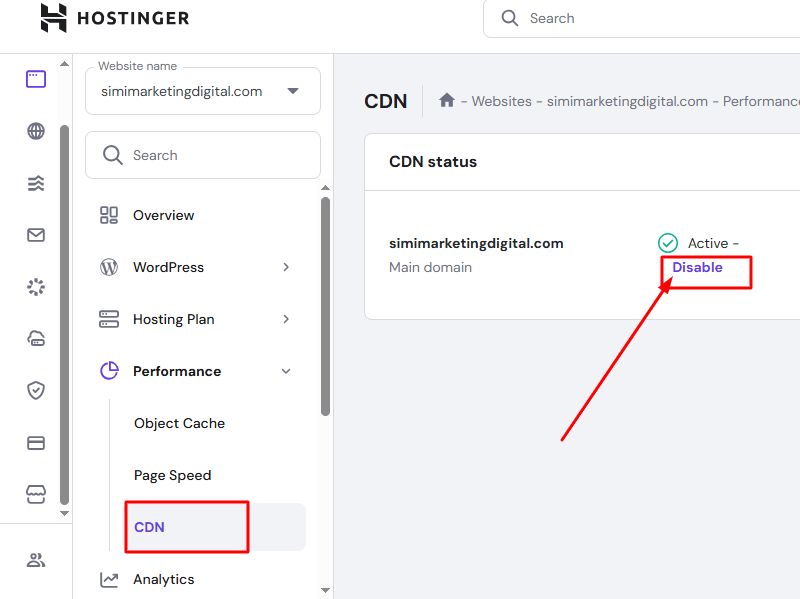
Before you start, disable any CDN (like Cloudflare or Hostinger’s CDN) to prevent old cached pages from appearing during the move.
Step 1: Back Up Your Entire WordPress Site
The golden rule of any site migration: always back up first. A single mistake could cost you hours, so let’s start with a full backup of your files and database.
Back Up Your Files
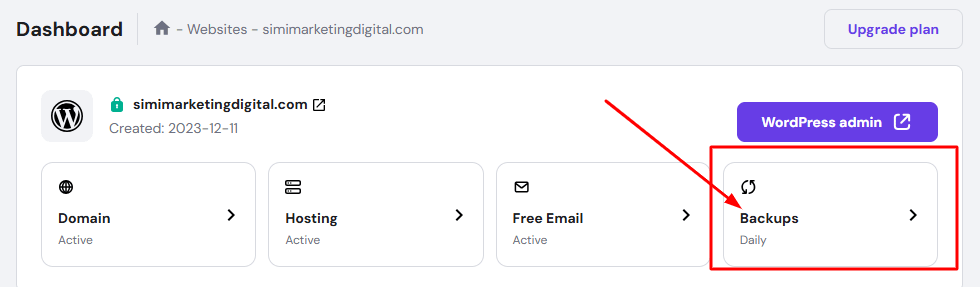
- 1. Log in to your Hostinger hPanel at https://hpanel.hostinger.com/.
- 2. Go to Home and select Manage your hosting plan.

- 3. Click Backup in the dashboard
4. Hit Create Backup and wait for it to finish
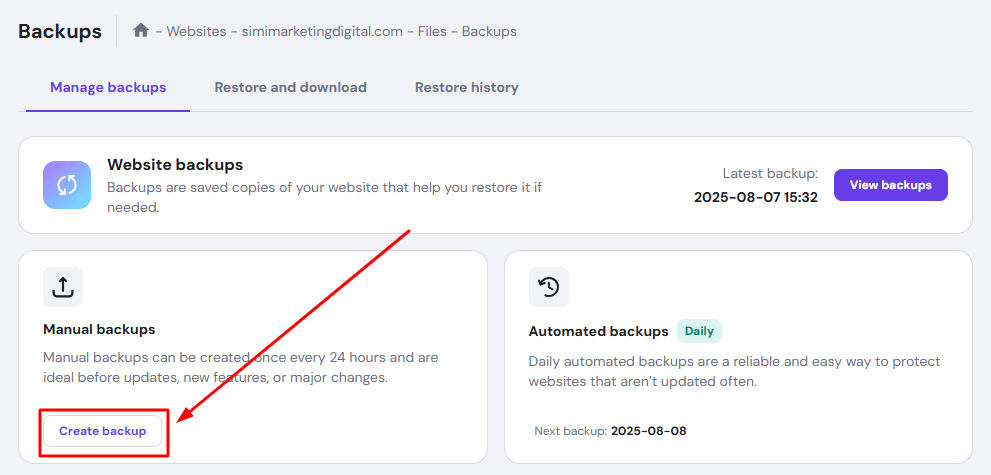
Note the timestamp for easy restoration later.
Back Up Your Database
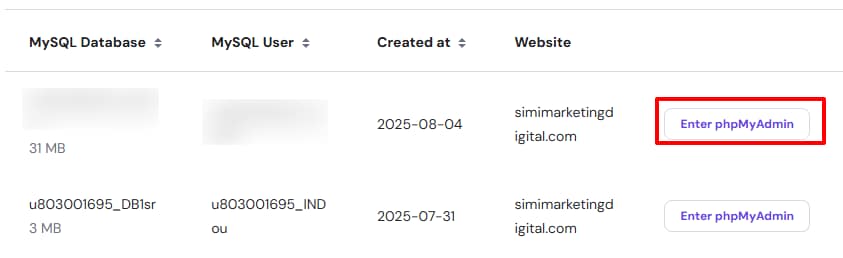
- In hPanel, navigate to Databases and select your WordPress database.
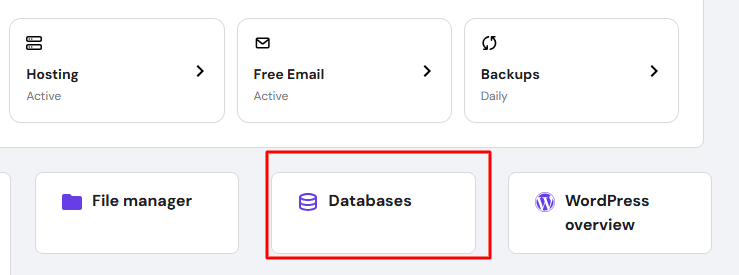
- Click phpMyAdmin to access it.
Make sure that you click the correct Database name, that you want to get access, to know the name of your Database name, check on this article
- In phpMyAdmin, select Export from the top menu.

- Choose the “Quick” method and SQL format, then download the file to your computer.
Bonus Tip: For added peace of mind, use UpdraftPlus to back up to cloud storage like Google Drive. It’s a lifesaver if you need to restore quickly, but your website should not exceed 15 GB of files to use UpdraftPlus
Store backups locally and on a cloud service. Hostinger’s backup system is reliable, but extra copies never hurt. Upgrade your Hostinger plan for more backup storage.
Step 2: Create the New Subfolder
Next, set up the subfolder where your WordPress files will live.
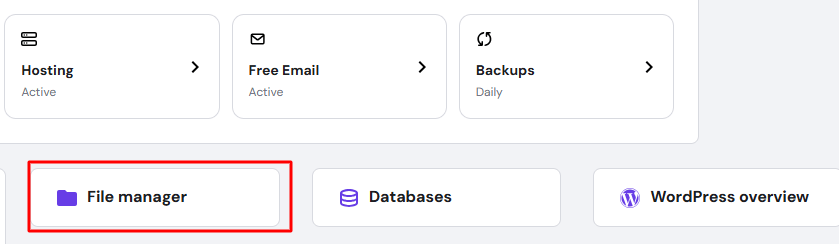
- 1. In hPanel, go to Manage > File Manager.
- 2. Open the public_html directory (your site’s root).
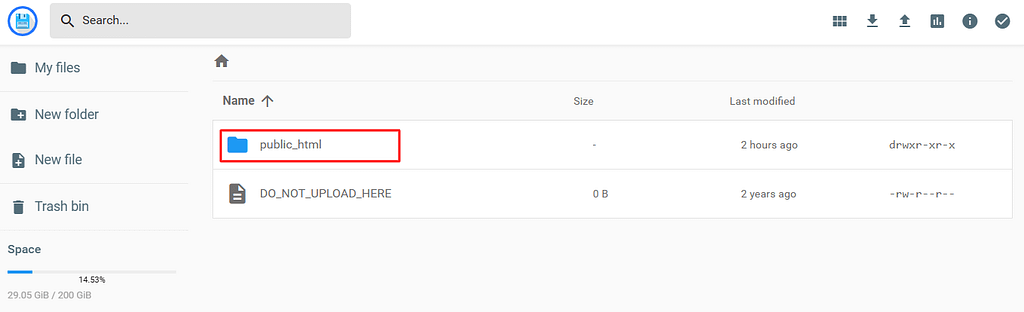
- 3. Click New Folder at the top.
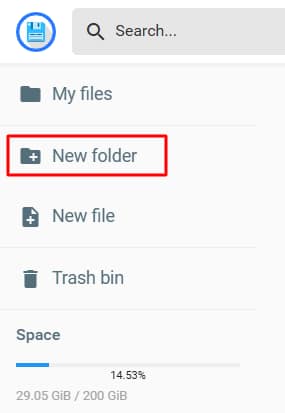
- 4. Name it your subfolder, like “es” for yourdomain.com/es. Stick to lowercase letters and avoid spaces.
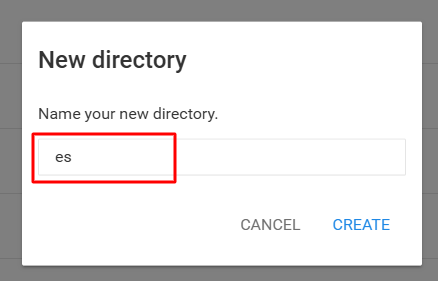
Your new subfolder is ready to receive files.
Common Mistake: Don’t use reserved names like “wp-admin” or existing folder names, it’ll cause conflicts.
Step 3: Move WordPress Files to the Subfolder
Now, let’s relocate your files.
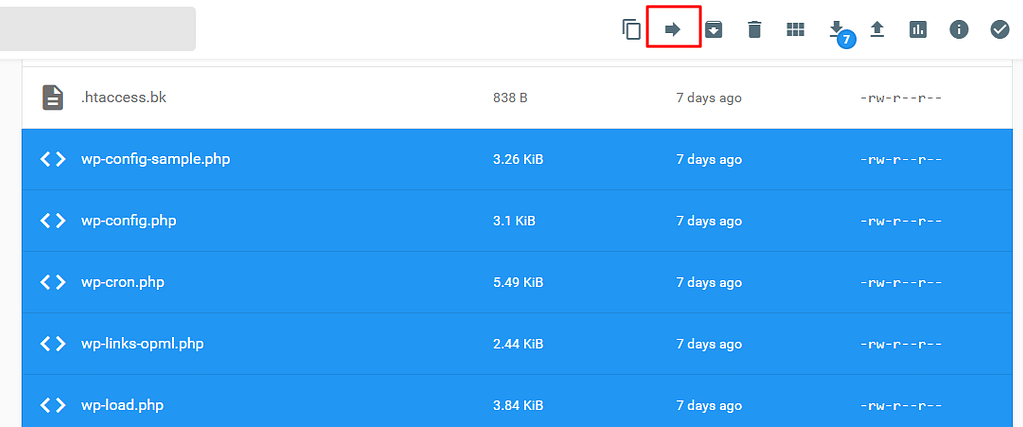
- 1. In File Manager, stay in public_html.
- 2. Select all files and folders with Ctrl+A (or Cmd+A on Mac).
- 3. Deselect your new subfolder to avoid moving it into itself.
- 4. Click Move from the top toolbar.
- 5. Select your subfolder as the destination and confirm.
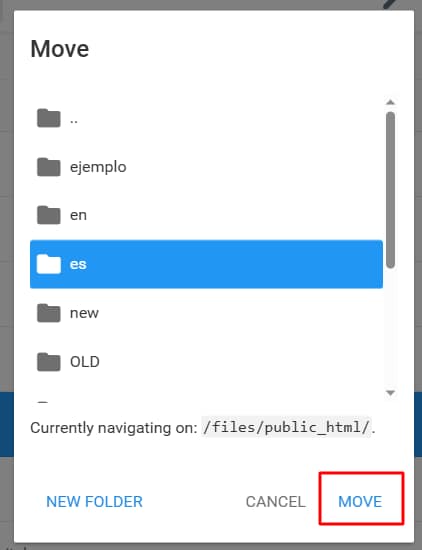
This might take a few minutes for larger sites. If you run into issues, check file permissions (folders: 755, files: 644) or use an FTP client like FileZilla for smoother transfers.
Important Note: Your site won’t load at the new URL yet, we’ll fix that in the next step.
Step 4: Update Your WordPress Site URLs
With files moved, update WordPress to recognize the new location.
Method 1: Edit wp-config.php (Best for Admin Access Issues)
- In File Manager, navigate to your subfolder (e.g., /es).
- Right-click wp-config.php and select Edit.
- Add these lines above “/* That’s all, stop editing! */”:
define('WP_HOME', 'https://yourdomain.com/subfolder'); define('WP_SITEURL', 'https://yourdomain.com/subfolder'); - Save changes.
Method 2: Update via phpMyAdmin (Recommended)
- Open phpMyAdmin from hPanel > Databases.
- Select your database and find the wp_options table (prefix may vary, like wpfb_options or jopje_options).
- Edit the siteurl and home rows to include /subfolder (e.g., https://yourdomain.com/es). in this article you’ll find the step-by-step how to update url via phpMyAdmin (if you want an article more detailed about it, let me know in the comment section)
Try accessing your dashboard at the new URL (e.g., yourdomain.com/es/wp-admin). If it loads, you’re on track! if it’s not, so acces directly on your wordpress dashboard on your hostinger panel.
Step 5: Regenerate Permalinks and Fix Internal Links
Log in to your WordPress dashboard at the new URL.
- Go to Settings > Permalinks.
- Click Save Changes to refresh rewrite rules (no need to change the structure).
Next, fix any broken links, images, or menus (if they are not broken, don’t use this step):
- Install and activate Better Search Replace.
- Go to Tools > Better Search Replace.
- Search for your old URL (https://yourdomain.com) and replace with the new one (https://yourdomain.com/subfolder).
- Select all tables, run a dry test first, then execute the replacement.
This ensures all internal links point to the new subfolder.
Pro Tip: Better Search Replace safely handles serialized data used by many plugins, avoiding database corruption.
Step 6: Set Up 301 Redirects to Protect SEO
To keep your search rankings and avoid 404 errors, redirect old URLs to new ones. For my site, I redirected root URLs to /es and /en to the root.
Using the Redirection Plugin (Easiest for Bulk Redirects)
- Install Redirection.
- Go to Tools > Redirection. Here you’re gonna make redirections for your all olds urls
- To have your urls, use the sitemap of your website , like: yourdomain.com/subfolder/sitemap_index.xml, you can use RankMath or Yoast SEO, to do that:
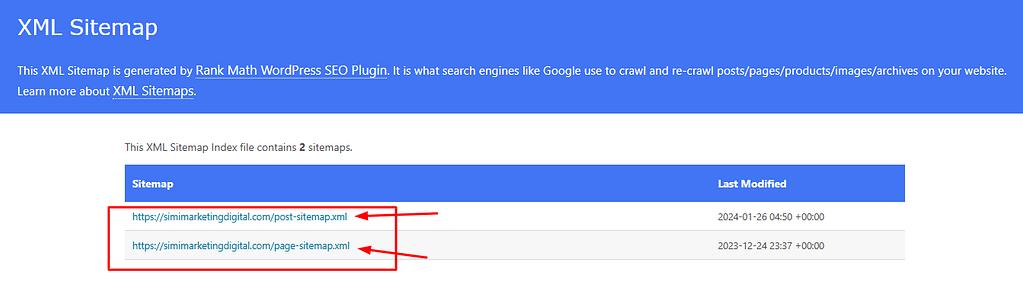
Go on the sitemap of your website, get click on all your posts pages link and COPY all the post and page links, PASTE all of them on Grok (free version) or ChatGPT (free version), and in bellow use that prompt:
Here is the list of current links now in my subdirectory. These pages used to be in the root.
Example:
Before (root): https://yourdomain.com/how-to-make-boat
Now (subdirectory): https://yourdomain.com/subfolder/how-to-make-boat

Please create a CSV file with two columns:
Old URL – the old root URL
New URL – the new subdirectory URL
This CSV will be used for 301 redirects.
- Save the output as a .csv file (not .doc) using a text editor like Notepad.
- In Redirection, go to Tools > Import and upload the .csv file.
Step 7: Notify Google Search Console and Bing Webmaster Tools
To help search engines update their indexes:
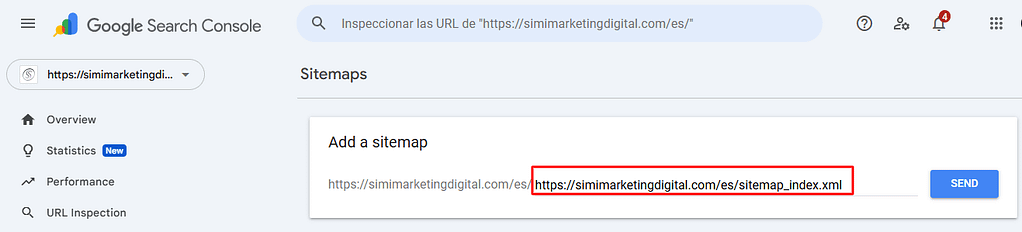
- Log in to Google Search Console.
- Add your subfolder as a new property (e.g., yourdomain.com/es) if not already verified.
- Into the dashboard of the property of your subdirectory in search console, submit an updated XML sitemap (generate via Yoast SEO > SEO > General > Features). it’s llike copy and paste your sitmap link: e.g: https://simimarketingdigital.com/es/sitemap_index.xml
- Use the URL Inspection tool to fetch and request indexing for key pages.
- Monitor the Coverage and Performance reports for crawl errors.
Repeat in Bing Webmaster Tools for Bing traffic.
What to Expect: A slight traffic dip is normal but should recover within 1-2 weeks with proper redirects.
Step 8: Test Your Site and Finalize
Before celebrating, test everything:
- Load pages at the new subfolder URL.
- Click old URLs to confirm they redirect correctly.
- Verify multilingual plugins (like WPML or TranslatePress) work if applicable.
- Use Broken Link Checker to find any issues.
- Re-enable your CDN and clear all caches.
- Monitor traffic in Google Analytics for anomalies.
If something breaks, restore from your backup and troubleshoot.
Bonus Tips: Avoid Common Mistakes and Optimize
From my experience, here’s how to stay out of trouble:
- Mistakes to Avoid: Skipping backups, forgetting redirects, not testing on mobile devices.
- Optimizations: Add a caching plugin like LiteSpeed Cache for speed. For multilingual sites, reconfigure plugins like TranslatePress.
- SEO Boost: Consider adding a blog in the root to drive more traffic.
Frequently Asked Questions about move files from ROOT to Subdirectory or Subfolder:
Will moving to a subfolder hurt my SEO?
No, with 301 redirects and sitemap updates, your rankings should stay safe.
Can I use this on Bluehost or HostGator?
Yes, the steps are similar, just adjust for their control panels.
What if I need to revert the changes?
Restore your backup and reverse the steps.
How do I handle multilingual plugins?
Reconfigure language switchers post-move to point to new URLs.
Why choose Hostinger for this?
Their hPanel and fast servers make migrations easy. Get started with Hostinger today.
More questions? Ask in the comments!
Final Thoughts
You’ve just learned how to move your WordPress site from root to subfolder on Hostinger, just like I did for simimarketingdigital.com. With this guide, your site should be better organized, user-friendly, and ready to grow, all without losing SEO or traffic.
If this tutorial helped, please share it with a friend or join our newsletter for more digital marketing tips. For top-notch hosting, check out Hostinger’s plans to power your WordPress site.
Have you tried this move? Run into any challenges? Drop a comment below, I’d love to hear your story and help out!